But now I have a much better idea of what I want!
 |
| I don't have sources for these, but they were all found by googling 'womens spring jacket' or 'hooded spring jackets'. Sorry guys, I saved a bunch of photos (to be deleted later) for ideas, and forgot to nab the sources. |
I'm hoping for something loosely fitted, but not way-oversized. I want a simple shape without a ton of seamlines (i.e. no princess seaming), but lots of details like drawstrings, fun pockets (welt? patch? welt and patch? flaps? WHO KNOWS!), sleeve tabs (maybe???), snaps, and definitely a hood. I want a zipper front, but maybe with a flap overtop with snaps? I want it to be easy wearing. And I want it to be past my butt, but not to my knees - perhaps mid-thigh? Maybe a little shorter?
I'm still uncertain if I want it lined or not. The hood will be, for sure, and probably in self-fabric.
I don't want a belt.
In fact, I sort of want exactly this, with a few tweaks:
 |
| Source |
What's great about using this pattern as my starting point is that not only have I sewn this before, but I still have the jacket! (It's the bottom right jacket in this photo.) So by trying it on, I could work out what pattern alterations were needed! WOO HOO!!! And hey look, here's some of them:
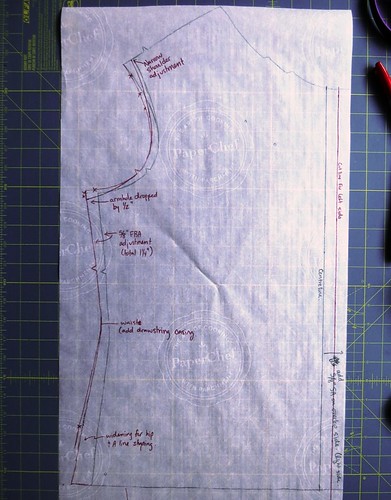
There's a few things that will change here - I'm still working out how the handle the zipper in the front, but I have my centre-line marked up, so it won't be hard to adjust it as needed. Note to self: work out what you want here before tomorrow. But in general, here are the alterations so far (marked up in red marker):
- 1 1/4" FBA (5/8" on each side), using this method for non-darted tops and small FBAs
- ...but instead of aligning the hip width on the final swing, I swung the original pattern piece (shown marked up in green, or possibly blue in the picture) out so that there was an added 1 inch at the hip
- I'll also be extending the hem line down about 9 inches on the actual fabric, but I'll work out the length on the back piece
- 1/2" narrow shoulder alteration
- Dropped the armhole down by 1/2"
- Raised the waistline up by about a 1/2"
I haven't altered the back yet, but that'll only need a 1/2" adjustment on the shoulders and armhole, plus re-tooling the sideseam below the waist, and all of this I can just copy from the front. Oh and lengthening, of course. I've also added an extra 1/2" width to the sleeves, and I might yet increase that by another 1/2" - I want those sleeve comfortable!
 |
| Was going to steal the two-piece hood from this gem, Simplcity 8936... |

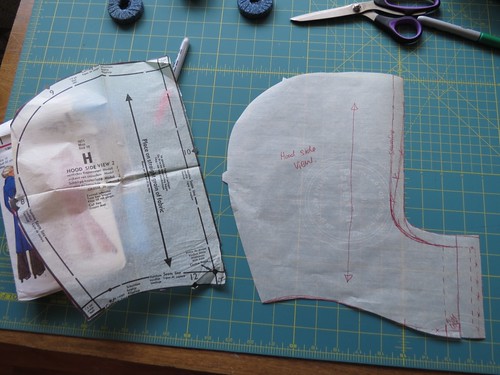
Again, the centre-line is marked up on the hood and some extra width is added to line up with the overlap over the zipper. But I'm still working out how to do that, and I think I've worked out that I'll need to have a separate piece for both the outer zipper overlap and the zipper shield inside. I originally thought I could just include the outer overlap on the right front piece and the inner zipper shield with the facing, but I think I've talked myself out of that now.
I might treat the whole jacket zipper like a front fly zipper on a pair of pants. Not that I've ever really done that (except in repairing a pair of the Boyfriend's hiking pants - I win at being a Girlfriend for that, btw), but there's enough tutorials and I'm a smart cookie, I'm sure I'll muddle through it well enough.
*~~*~~*~~*~~*
Well okay, that was enough babbling for one day. I've missed doing intensive planning posts and a lot of progress posts, like I used to do over on Sewing on Pins. I have some thinky stewing in my brain about blogging - how I used to blog, how that's changed, and how I feel the whole online sewing community has evolved over time - but that's for another day.
For now, wish me luck - because I totally want to cut into my fabric and have the shell sewn together by tomorrow evening! Or at least cut out. Maybe just the pattern alterations done. WE'LL SEE!
No comments:
Post a Comment